

Table of contents
What is a Brookie?
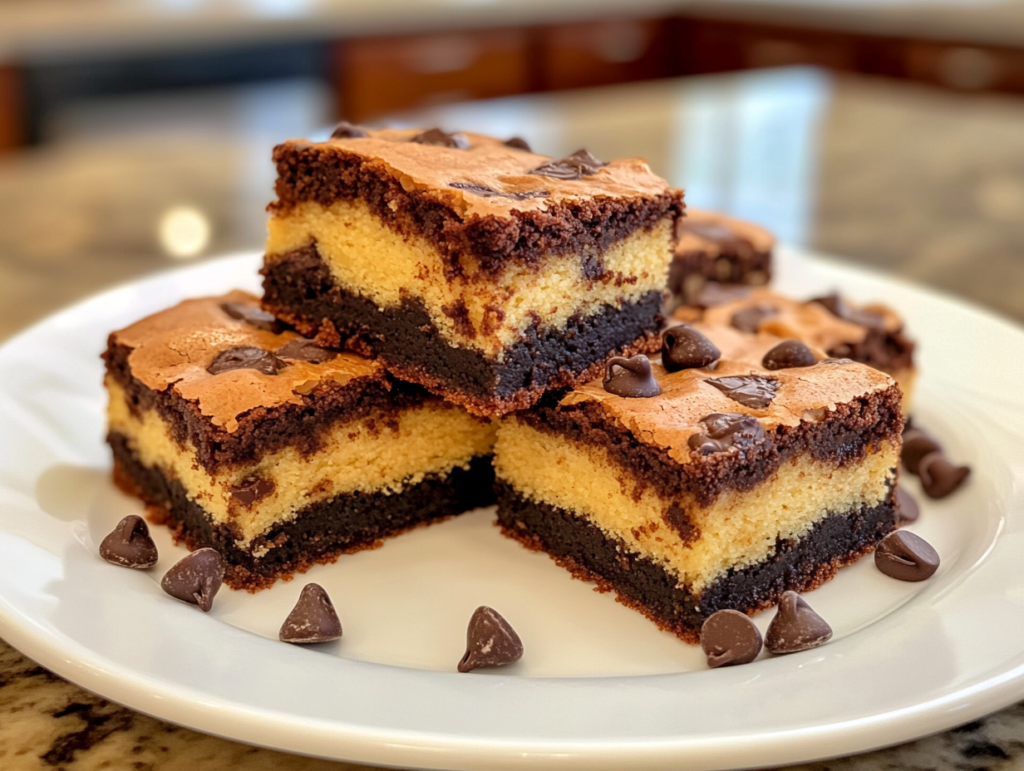
A brookie is a delightful hybrid dessert that combines two beloved treats—brownies and cookies—into one irresistible creation. The term “brookie” comes from merging the words “brownie” and “cookie,” reflecting the dessert’s composition. Typically, brookies feature a layer of rich, fudgy brownie topped with or mixed into a layer of chewy, buttery cookie dough. The result is a two-in-one dessert that offers the best of both worlds: the dense, chocolatey goodness of a brownie paired with the sweet, crisp-yet-soft texture of a cookie.
History and Popularity of Brookies
The concept of combining desserts is not new, but brookies have gained significant popularity in recent years. While the exact origins of the brookie are unclear, they are believed to have emerged from the creative kitchens of home bakers and dessert enthusiasts experimenting with traditional recipes. Over time, brookies found their way into bakeries, restaurants, and even pre-packaged grocery store products.
The rise of brookies can also be attributed to the growing trend of mash-up foods, where two or more classic dishes are combined to create something entirely new. Social media platforms like Instagram and Pinterest have played a significant role in boosting the brookie’s fame, with eye-catching photos and viral recipes inspiring millions to try making brookies at home. Their versatility and ability to appeal to both brownie and cookie lovers make brookies a go-to dessert for special occasions, parties, and everyday indulgence.
Brookie vs. Traditional Desserts: What Makes It Unique?
What sets a brookie apart from other traditional desserts is its innovative blend of textures and flavors. Unlike choosing between a brownie or a cookie, a brookie lets you enjoy both simultaneously in a single bite. Here’s what makes brookies unique:
- Textural Contrast: The dense and gooey brownie layer contrasts perfectly with the lighter, slightly crunchy cookie layer.
- Flavor Combination: Brookies deliver the rich, chocolate-forward flavor of brownies combined with the buttery sweetness of cookies.
- Versatility: They can be customized with various mix-ins such as nuts, chocolate chips, caramel swirls, or even peanut butter.
- Convenience: Instead of baking two separate desserts, a brookie allows you to satisfy multiple cravings with a single creation.
Brookies are the epitome of culinary creativity, providing an exciting twist on traditional desserts and ensuring there’s always something for everyone to enjoy.
Ingredients Needed to Make a Brookie
Creating a brookie requires a combination of ingredients to form the two distinct layers: the cookie layer and the brownie layer. Each layer has its unique set of components, but together they create a perfect harmony of flavors and textures. Below is a breakdown of the essential ingredients for each layer, along with some optional add-ons to elevate your brookie.
Essential Ingredients for the Cookie Layer
To craft the delicious cookie layer, you’ll need the following basic ingredients:
- All-Purpose Flour: Provides structure and ensures the cookie layer holds its shape.
- Brown Sugar: Adds a deep, caramel-like sweetness and helps keep the cookie layer chewy.
- Granulated Sugar: Balances the sweetness and aids in the perfect cookie texture.
- Butter: Gives the cookie layer its rich flavor and soft, melt-in-your-mouth quality. Use unsalted butter for better control of the saltiness.
- Egg: Acts as a binder to hold all the ingredients together.
- Vanilla Extract: Enhances the overall flavor of the cookie dough.
- Baking Soda: Ensures the cookie layer rises slightly, creating a soft yet firm texture.
- Chocolate Chips: Adds bursts of gooey chocolate to complement the brownie layer.
Key Ingredients for the Brownie Layer
The brownie layer requires these essential ingredients to achieve its signature fudgy texture and rich taste:
- Unsweetened Cocoa Powder: Provides the deep chocolate flavor that brownies are known for.
- All-Purpose Flour: Keeps the brownie layer structured but still soft and gooey.
- Granulated Sugar: Sweetens the brownie layer and balances the cocoa’s bitterness.
- Butter: Adds richness and creates a moist texture.
- Eggs: Contribute to the fudginess and help bind the brownie batter.
- Vanilla Extract: Enhances the chocolate flavor and adds depth to the brownie.
- Salt: A pinch of salt amplifies the chocolate flavor and balances the sweetness.
Optional Add-ons and Flavor Enhancements
To make your brookies extra special, consider incorporating these optional ingredients and add-ons:
- Nuts: Add chopped walnuts, pecans, or almonds for crunch and a nutty flavor.
- Caramel or Peanut Butter Swirls: Drizzle or swirl into the brownie batter for a delightful twist.
- White Chocolate Chips: Use them in the cookie layer for a contrast in flavor and color.
- Sea Salt: Sprinkle a pinch of flaky sea salt on top after baking to enhance the overall flavor.
- Candy Pieces: Mix in mini M&Ms, toffee bits, or crushed candies for a playful touch.
- Spices: Add a hint of cinnamon or espresso powder for a subtle but complex flavor profile.
By combining these ingredients with care, you’ll create a brookie that’s not only delicious but also versatile enough to cater to different tastes and preferences.
Tools and Equipment for Assembling a Brookie
Making a brookie is a straightforward process, but having the right tools and equipment can make the experience smoother and more enjoyable. Below is a list of essential and optional tools you’ll need to assemble and bake the perfect brookie.
Must-Have Baking Tools
These are the essential tools you’ll need to create and bake brookies effectively:
- Mixing Bowls: At least two medium to large bowls—one for the cookie dough and one for the brownie batter.
- Whisk: Useful for combining dry ingredients and beating eggs for a smooth batter.
- Spatula: For scraping down the sides of the bowl and evenly spreading the layers in the pan.
- Measuring Cups and Spoons: Ensures accurate measurement of ingredients for a balanced brookie.
- Electric Mixer or Hand Mixer: Speeds up the mixing process, especially for creaming butter and sugar.
- Baking Pan: A square or rectangular pan (typically 8×8 inches or 9×13 inches, depending on the recipe) for baking the brookies.
- Parchment Paper: Makes it easy to remove the brookies from the pan and simplifies cleanup.
- Oven Mitts: Protect your hands while handling the hot baking pan.
- Knife or Bench Scraper: For cutting the brookies into neat portions after cooling.
Optional Tools to Make the Process Easier
While not mandatory, these tools can simplify the process and improve the quality of your brookies:
- Silicone Baking Mat: An alternative to parchment paper that can be reused and provides a non-stick surface.
- Offset Spatula: Helps in evenly spreading the layers of batter for a professional finish.
- Sifter or Fine Mesh Strainer: Ensures dry ingredients like flour and cocoa powder are lump-free for smoother batter.
- Kitchen Scale: Offers precise measurements for more consistent results, especially for professional-level baking.
- Cookie Scoop: Useful for portioning out cookie dough evenly.
- Toothpicks or Cake Tester: Helps check for doneness without disturbing the brookies too much.
- Cooling Rack: Allows air to circulate around the baked brookies, speeding up the cooling process and preventing sogginess.
- Spray Bottle or Pastry Brush: Can be used to add a light mist of water or butter to enhance texture (e.g., creating a glossy brownie top).
Having these tools on hand ensures a smooth process and lets you focus on crafting a delicious brookie that combines the best qualities of brownies and cookies.
Preparing the Cookie Dough Base
The cookie dough layer is a critical component of a brookie, providing a buttery and chewy contrast to the dense brownie layer. Preparing the dough correctly ensures your brookies have the perfect texture and flavor. Below is a step-by-step guide and tips to avoid common mistakes while making cookie dough.
Step-by-Step Guide to Perfect Cookie Dough
- Gather Ingredients
Ensure all your ingredients are at room temperature for smoother mixing. Typical ingredients include unsalted butter, brown sugar, granulated sugar, eggs, vanilla extract, all-purpose flour, baking soda, and chocolate chips. - Cream Butter and Sugars
- Use a hand mixer or stand mixer to cream the butter, brown sugar, and granulated sugar until the mixture is light and fluffy. This step is crucial for creating a tender cookie texture.
- Make sure to scrape the sides of the bowl to ensure the mixture is evenly combined.
- Add Wet Ingredients
- Add the eggs one at a time, beating well after each addition to ensure thorough mixing.
- Add the vanilla extract to enhance the flavor.
- Combine Dry Ingredients
- In a separate bowl, whisk together the flour, baking soda, and a pinch of salt. This ensures the leavening agent is evenly distributed.
- Gradually add the dry mixture to the wet mixture, mixing on low speed to avoid overworking the dough.
- Fold in Mix-ins
- Gently fold in chocolate chips or other add-ins like nuts or candy pieces using a spatula.
- Chill the Dough (Optional)
- For a firmer cookie layer and easier spreading, chill the dough for 15–30 minutes. This step is especially helpful if your kitchen is warm.
- Spread in Pan
- Evenly press the cookie dough into your prepared baking pan, creating a smooth layer that serves as the base or top layer of your brookie.
Common Mistakes to Avoid While Making Cookie Dough
- Using Cold Butter
- Cold butter doesn’t cream well and can result in unevenly mixed dough. Always use room-temperature butter unless the recipe specifies otherwise.
- Skipping the Creaming Step
- Properly creaming the butter and sugars is essential for a light, chewy texture. Rushing this step can lead to dense cookies.
- Overmixing the Dough
- Overmixing after adding the flour can develop too much gluten, making the cookie layer tough instead of tender.
- Ignoring Ingredient Measurements
- Baking is a science; small deviations can lead to unbalanced dough. Always measure ingredients accurately.
- Adding Wet Ingredients Too Quickly
- Incorporate eggs and vanilla one at a time to avoid curdling or uneven mixing.
- Forgetting to Chill the Dough
- If the dough is too soft, it may spread too much during baking, resulting in an uneven brookie.
- Overloading Mix-ins
- Adding too many chocolate chips or other extras can make the dough difficult to spread and lead to uneven baking.
By following these steps and avoiding common pitfalls, you’ll create a cookie dough base that’s perfectly balanced, ensuring your brookies are a hit!
Crafting the Perfect Brownie Batter
The brownie layer is the foundation of the rich, chocolatey goodness in a brookie. Achieving the perfect brownie batter requires attention to detail to ensure it’s moist, fudgy, and decadent. Below is a guide on essential steps to create a flawless brownie batter and tips for achieving the ideal texture for your brownie layer.
Essential Steps for Rich and Fudgy Brownies
- Gather Ingredients
Common ingredients for brownie batter include unsalted butter, sugar, eggs, unsweetened cocoa powder, all-purpose flour, vanilla extract, and a pinch of salt. - Melt Butter and Combine with Cocoa
- Gently melt the butter in a microwave or over a stovetop until smooth.
- Mix the melted butter with cocoa powder until fully combined. This step creates a deep chocolate flavor.
- Incorporate Sugar
- Stir granulated sugar into the butter and cocoa mixture. The sugar should dissolve slightly to create a smooth base.
- Add Eggs and Vanilla Extract
- Beat in the eggs one at a time. This step is crucial for achieving a fudgy texture.
- Mix in vanilla extract for an extra layer of flavor.
- Mix Dry Ingredients Separately
- In a separate bowl, whisk together flour and salt to ensure even distribution. This prevents lumps in the batter.
- Combine Wet and Dry Mixtures
- Slowly fold the dry ingredients into the wet mixture, incorporating them gently. Avoid overmixing, as this can result in a dense texture.
- Optional Add-ins
- Stir in extras like chocolate chunks, nuts, or swirls of caramel or peanut butter for added flavor.
- Layer in Pan
- Spread the brownie batter evenly in your prepared baking pan, either as the base or a layer within your brookie.
How to Achieve the Ideal Texture for Your Brownie Layer
- Use High-Quality Ingredients
- Opt for unsweetened cocoa powder and real vanilla extract to enhance the depth of flavor.
- Balance Wet and Dry Ratios
- Ensure the right proportion of eggs, butter, and flour for a fudgy consistency. Too much flour can lead to cakey brownies.
- Don’t Overmix
- Overmixing activates gluten in the flour, making the brownie layer tough. Mix until just combined.
- Monitor Baking Time
- Brownies will continue to firm up as they cool after being taken out of the oven. Bake until a toothpick inserted comes out with moist crumbs, not wet batter, for a perfectly fudgy texture.
- Control the Temperature
- Bake at the correct temperature (typically 325°F–350°F). Too high a temperature can dry out the brownie layer.
- Cool Before Cutting
- Allow the brookie to cool completely before slicing. This helps the layers set and prevents the brownie layer from falling apart.
By following these steps, you’ll create a brownie batter that’s rich, fudgy, and irresistibly indulgent—perfect for complementing the cookie layer in your brookie!
Layering Techniques for the Best Brookie
The art of layering is crucial to crafting the perfect brookie. Properly executed layers create a visually appealing dessert with distinct textures and flavors. Here’s a guide to achieving even and uniform layers, preventing mixing, and ensuring the ideal balance of crisp edges and a chewy center.
Strategies for Even and Uniform Layers
- Prepare Each Batter Separately
- Ensure your cookie dough and brownie batter are fully prepared before layering. This minimizes time between steps and allows for better control during assembly.
- Line the Pan Properly
- Line the pan with parchment paper or a silicone baking mat for easy removal and cleanup. Leave extra parchment paper hanging over the edges for easy removal.
- Start with the Brownie Layer
- Pour the brownie batter into the prepared pan and spread it evenly with a spatula or offset knife. Use gentle motions to avoid creating uneven spots.
- Add the Cookie Dough Layer Carefully
- If the cookie dough is sticky, flatten it into smaller discs with your hands and place them gently on top of the brownie batter. Press lightly to create an even layer without mixing the batters.
- Chill Before Baking (Optional)
- For more defined layers, chill the assembled brookie for 15–20 minutes before baking. This helps the batters set and prevents excessive spreading.
How to Prevent Layers from Mixing
- Ensure Batter Consistency
- Keep the brownie batter slightly thicker and the cookie dough slightly chilled to maintain distinct layers. A runny brownie batter or overly soft cookie dough can lead to mixing.
- Use a Light Touch
- Avoid pressing too hard when spreading the top layer. Let gravity and light smoothing do most of the work.
- Bake at a Controlled Temperature
- Bake at the recipe’s recommended temperature, typically around 325°F–350°F. A gradual rise in temperature helps the layers bake evenly without blending.
- Don’t Overfill the Pan
- Leave a small gap at the top of the pan to prevent overflow, which can cause layers to mix during baking.
Tricks for a Crisp Edge and Chewy Center
- Grease the Pan Sides Lightly
- Use non-stick spray or butter to lightly grease the sides of the pan, ensuring the edges bake crisply while allowing easy removal.
- Use the Right Pan Size
- Ensure the pan is the correct size as specified in the recipe. An oversized pan can lead to overbaking the edges, while an undersized one can cause uneven cooking.
- Control Baking Time
- Bake the brookie until the edges are set and slightly firm, while the center remains slightly underbaked. This creates a crisp exterior and chewy middle as the brookie cools.
- Cool Completely Before Slicing
- Allow the brookie to cool in the pan for 10–15 minutes before transferring it to a wire rack. Cooling helps the layers set and makes cutting easier.
- Slice with Precision
- Use a sharp knife or bench scraper to cut the brookie. Clean the knife between cuts for neat edges.
By following these techniques, you’ll achieve a brookie with distinct, beautiful layers, a perfect balance of textures, and a dessert that’s sure to impress!
Baking the Brookie
Baking the brookie is the final and critical step in creating this delicious hybrid dessert. Getting the temperature, timing, and doneness right ensures a perfectly baked brookie with a chewy cookie layer and a fudgy brownie base. Below is a guide to ideal baking practices, signs of a perfectly baked brookie, and solutions to common baking issues.
Ideal Oven Temperatures and Baking Times
- Preheat the Oven
- Always preheat your oven to ensure even baking. Most brookie recipes recommend temperatures between 325°F (165°C) and 350°F (175°C).
- Adjust for Pan Size
- An 8×8-inch pan typically takes 30–35 minutes at 350°F.
- A 9×13-inch pan may bake faster and take around 25–30 minutes.
- If using a glass or ceramic pan, lower the temperature by 25°F and extend the baking time slightly, as these materials retain heat longer.
- Use the Middle Rack
- Place the pan on the middle rack for even heat distribution. Avoid placing it too close to the top or bottom, which can lead to uneven cooking.
- Monitor the Bake
- Start checking for doneness 5 minutes before the recommended baking time to avoid overbaking.
Signs Your Brookie Is Perfectly Baked
- Golden-Brown Cookie Layer
- The cookie layer should be lightly golden on top, indicating it is cooked without being overly crisp.
- Slightly Set Brownie Edges
- The edges of the brownie layer should be firm but not hard. The center may still look slightly underbaked but will set as it cools.
- Toothpick Test
- Insert a toothpick into the center of the brookie; it should come out with a few moist crumbs but no wet batter. Be cautious: overly clean toothpicks may indicate overbaking.
- Even Rise
- The brookie should rise evenly with no excessive bubbling or sinking.
Troubleshooting Undercooked or Overbaked Brookies
Undercooked Brookies
- Signs:
- The center is too wet or gooey, and layers collapse when cut.
- Causes:
- The oven temperature may have been too low, or the bake time too short.
- Using a pan that is too small can result in thicker layers that take longer to cook.
- Solutions:
- Cover the pan loosely with aluminum foil and return it to the oven. Bake at a lower temperature (about 300°F) for 5–10 additional minutes.
- Let the brookie cool completely before cutting; the residual heat may continue to set the layers.
Overbaked Brookies
- Signs:
- The edges are dry or hard, and the cookie layer is overly browned.
- Causes:
- Baking at too high a temperature or leaving the brookie in the oven too long.
- Using a dark or metal pan without adjusting the temperature.
- Solutions:
- Trim overly dry edges before serving.
- Serve with a topping like whipped cream or ice cream to add moisture.
- To prevent future issues, reduce the oven temperature by 25°F for dark pans and set a timer to check 5 minutes before the end of the baking time.
By following these baking tips, you’ll ensure a brookie that’s perfectly balanced, with crisp edges, a chewy center, and layers that complement each other beautifully.
Related Articles you Might Like
When learning how to assemble a brookie, it’s important to have a clear understanding of the core components and steps involved. For a comprehensive guide on the complete recipe, check out the detailed instructions in Brookie Recipe. Additionally, understanding the differences between brookies and similar desserts like blondies can enhance your baking knowledge; explore this in Blondie vs. Brookie: Differences Explained. Finally, if you’re curious about the ingredients and their roles in crafting the perfect brookie, you’ll find valuable insights in What Are Brookies Made Of?.
Frequently Asked Questions
Can You Freeze Brookies?
Yes, brookies can be frozen for later enjoyment! To freeze, first allow the brookies to cool completely. Then, cut them into individual portions and wrap each piece tightly in plastic wrap or aluminum foil. Place the wrapped pieces in an airtight container or freezer-safe bag, and store them in the freezer for up to 3 months. To thaw, simply leave them at room temperature for a few hours or heat them in the oven for a freshly baked texture.
What’s the Best Way to Reheat Brookies?
The best way to reheat brookies is in the oven or microwave, depending on how quickly you want to enjoy them:
- Oven Method: Preheat your oven to 325°F (165°C). Place the brookies on a baking sheet and cover them loosely with foil to prevent drying out. Heat for 5–10 minutes, or until warmed through.
- Microwave Method: Place a single portion on a microwave-safe plate and heat for 10–20 seconds, depending on the wattage of your microwave. Be careful not to overheat, as this can make the brookie dry or rubbery.
How Do I Prevent My Brookie Layers from Mixing?
Preventing the layers from mixing requires careful preparation and layering techniques:
- Consistency of Batters: Ensure that the brownie batter is thick but spreadable, and the cookie dough is slightly chilled to hold its shape better.
- Layer Gently: Spread the brownie batter evenly in the pan, then carefully add the cookie dough layer on top. Flatten the cookie dough into discs or pieces and gently press them into place without dragging through the brownie batter.
- Bake at the Right Temperature: Baking at a controlled temperature (around 325°F–350°F) ensures that the layers cook evenly without merging.
- Chill Before Baking (Optional): For sharper, more defined layers, consider chilling the assembled brookie in the refrigerator for 15–20 minutes before baking.
By following these tips, you’ll achieve beautifully distinct layers in your brookies every time.
Conclusion: Enjoy Your Perfectly Assembled Brookie
Congratulations! You’ve mastered the art of creating a brookie—a dessert that combines the best of both worlds, brownies and cookies, into one irresistible treat. With the right ingredients, tools, and techniques, you’ve layered and baked a dessert that is as delightful to look at as it is to eat.
Whether you’re enjoying it fresh out of the oven, reheating leftovers for a quick indulgence, or serving it to guests, your brookie is sure to impress. Don’t forget to experiment with optional add-ins like nuts, caramel swirls, or a sprinkle of sea salt to make your brookie uniquely yours. Most importantly, savor the rich, chewy, and fudgy layers you’ve created—because every bite of a brookie is a celebration of creativity and deliciousness!