

If you’re looking for a tasty, protein-packed dessert that satisfies your sweet tooth while keeping your nutrition on track, protein pudding is the perfect solution! Whether you’re a fitness enthusiast, someone trying to increase protein intake, or just craving a creamy treat without the guilt, this recipe is for you.
Protein pudding is a simple, quick, and versatile dish that requires minimal ingredients and effort. It can be customized to fit different dietary needs—whether you prefer dairy-based, vegan, low-carb, or keto-friendly options. Plus, it’s an excellent post-workout snack, a nutritious breakfast alternative, or a guilt-free dessert to enjoy anytime.
In this article, we’ll walk you through everything you need to know about making protein pudding, including the best ingredients, variations, storage tips, and serving ideas. You’ll also discover how this high-protein treat can support your fitness and weight loss goals.
Table of contents
Ingredients for the Best Protein Pudding Recipe
The secret to a delicious and creamy protein pudding lies in choosing the right ingredients. Whether you’re making a classic chocolate pudding or experimenting with different flavors, the quality of ingredients can make all the difference.
Choosing the Right Protein Powder
The type of protein powder you use will affect the taste, texture, and nutritional value of your pudding. Here are some great options:
- Whey Protein: Offers a smooth texture and blends well, making it ideal for pudding.
- Casein Protein: Thickens naturally and creates a creamier consistency.
- Plant-Based Protein: Great for vegans; options include pea, hemp, or brown rice protein.
- Collagen Protein: Adds protein without altering texture but doesn’t thicken as much.
For the best results, use a protein powder with a flavor that complements your pudding (e.g., chocolate, vanilla, or peanut butter).
Dairy vs. Dairy-Free Options
The liquid you use plays a huge role in achieving the right consistency. Here are some great choices:
- Milk: Whole milk or skim milk provides a creamier texture and richer taste.
- Almond Milk: A low-calorie, dairy-free option that adds a mild nutty flavor.
- Coconut Milk: Makes the pudding extra creamy with a hint of coconut.
- Oat Milk: A smooth and slightly sweet alternative.
- Greek Yogurt: Adds thickness and extra protein while making the pudding rich and creamy.
Natural Sweeteners and Flavor Enhancements
To keep your protein pudding healthy, opt for natural sweeteners instead of processed sugar:
- Honey or Maple Syrup: Adds natural sweetness with a rich flavor.
- Stevia or Monk Fruit Sweetener: Great for low-carb and keto-friendly options.
- Banana or Applesauce: A natural way to sweeten while adding texture.
For an extra flavor boost, consider:
- Unsweetened Cocoa Powder: Perfect for chocolate pudding lovers.
- Vanilla Extract: Enhances sweetness without extra sugar.
- Cinnamon or Nutmeg: Adds warmth and depth to your pudding.
By mixing and matching these ingredients, you can create a protein pudding that fits your dietary needs and flavor preferences.
How to Make Protein Pudding Recipe
Making protein pudding is incredibly simple and requires just a few ingredients and minimal effort. Whether you prefer a classic chocolate flavor, a creamy vanilla option, or a peanut butter twist, the process remains the same. Follow these steps for a smooth, delicious protein-packed dessert.
Step-by-Step Instructions
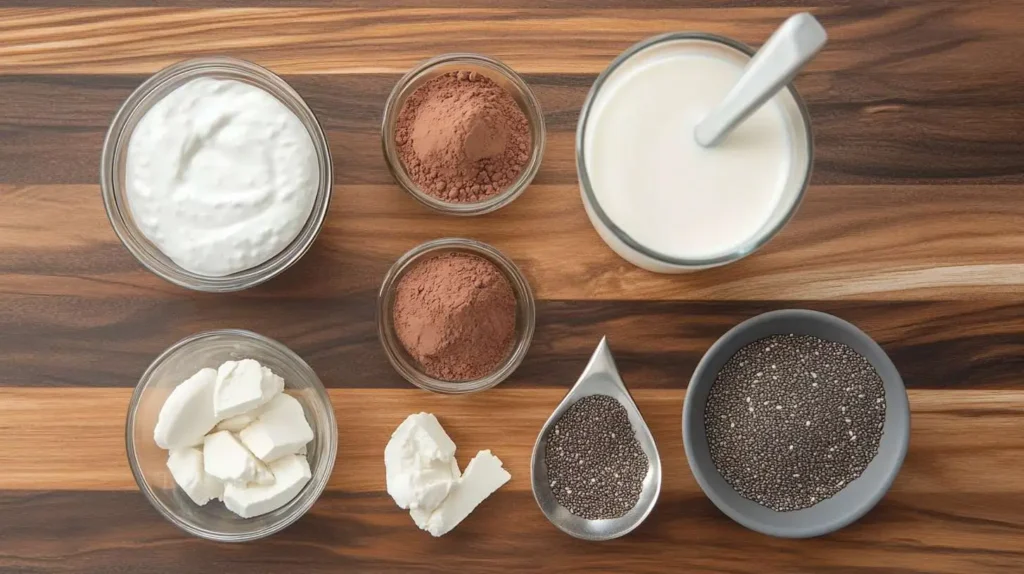
Ingredients:
- 1 scoop of your favorite protein powder (chocolate, vanilla, or unflavored)
- ¾ cup of milk or dairy-free alternative (almond, coconut, oat, etc.)
- 1 tablespoon of unsweetened cocoa powder (for chocolate pudding)
- 1 teaspoon of vanilla extract (optional)
- 1 tablespoon of a natural sweetener (honey, maple syrup, or stevia)
- 2 tablespoons of Greek yogurt (optional, for extra creaminess)
- 1 tablespoon of chia seeds or cornstarch (to help thicken)
Instructions:
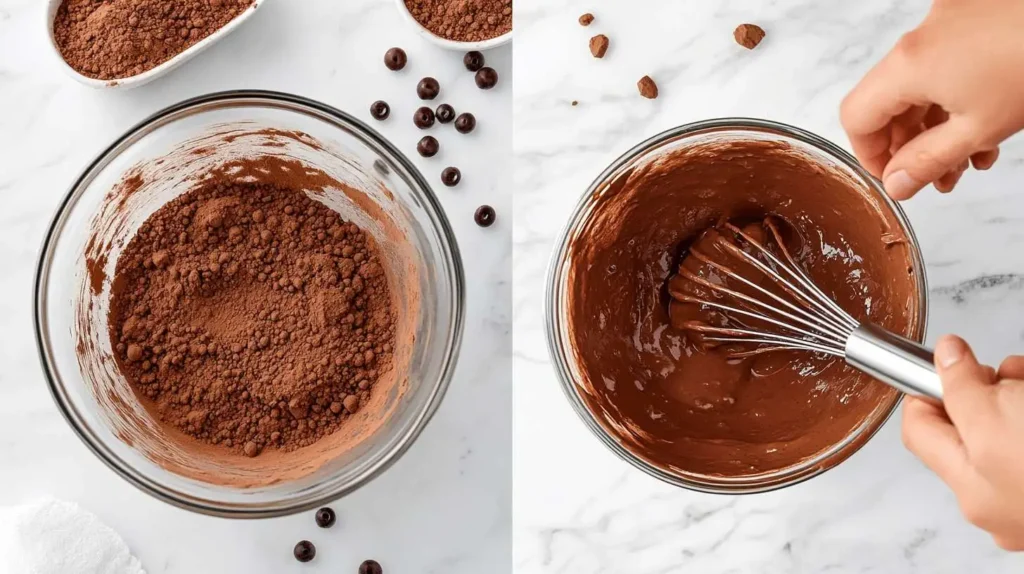
- Mix Dry Ingredients: In a bowl, combine the protein powder, cocoa powder (if using), and any other dry ingredients like chia seeds or cornstarch. Stir well to prevent clumping.
- Add Liquid Ingredients: Slowly pour in the milk or dairy-free alternative while whisking continuously. This helps create a smooth, lump-free mixture.
- Add Sweeteners and Enhancers: Stir in the vanilla extract and natural sweetener of your choice. If you want an extra creamy pudding, mix in Greek yogurt.
- Blend or Whisk: For the smoothest texture, use a blender or immersion blender to fully incorporate all ingredients. If mixing by hand, use a whisk and stir vigorously until everything is well combined.
- Chill and Thicken: Pour the mixture into a serving bowl or container, cover, and refrigerate for at least 30-60 minutes. This allows the pudding to thicken properly.
- Enjoy! Once set, give it a final stir and top with your favorite toppings like berries, nuts, or a drizzle of nut butter.
Tips for the Perfect Consistency
- Too Thick? Add a splash of milk and mix well.
- Too Runny? Let it chill longer or add a bit more chia seeds or Greek yogurt.
- Not Sweet Enough? Adjust sweetness to taste with a natural sweetener.
With these simple steps, you can enjoy a healthy, protein-rich pudding anytime!
Protein Pudding Recipe: Common Mistakes to Avoid
While making protein pudding is simple, a few common mistakes can lead to a texture that’s too runny, too thick, or just not as tasty as it should be. Here’s what to watch out for:
1. Using the Wrong Protein Powder
Not all protein powders work well for pudding. Some plant-based powders can be grainy, while certain whey powders may make the pudding too runny. Solution: Choose casein protein or a blend with a thicker consistency for the best texture.
2. Overmixing or Undermixing
- Overmixing can introduce too much air, making the pudding foamy instead of creamy.
- Undermixing can leave clumps of protein powder, creating an uneven texture.
Solution: Blend just enough to create a smooth and creamy mixture.
3. Not Letting It Chill Properly
Protein pudding needs time to set and thicken. If you eat it immediately, it might be too runny.
Solution: Refrigerate it for at least 30-60 minutes to allow it to firm up.
4. Adding Too Much or Too Little Liquid
Getting the right balance of liquid is key.
- Too much liquid? Your pudding will be watery.
- Too little liquid? It will be too thick and dry.
Solution: Start with less liquid and gradually add more if needed.
5. Not Using a Thickening Agent
Some protein powders don’t thicken well on their own.
Solution: Add ingredients like chia seeds, Greek yogurt, or cornstarch to help create a richer texture.
6. Skipping the Sweetener or Flavor Enhancements
Protein powder alone may not provide enough flavor.
Solution: Add natural sweeteners (honey, stevia, maple syrup) and flavor enhancers like vanilla extract or cocoa powder for a better taste.
7. Using a Low-Quality Protein Powder
Cheap protein powders often contain fillers and artificial ingredients that can affect the taste and texture.
Solution: Invest in a high-quality protein powder with minimal additives.
By avoiding these mistakes, you’ll be able to enjoy a smooth, delicious, and protein-packed pudding every time!
Conclusion
Protein pudding is a delicious, nutritious, and versatile treat that fits into any healthy lifestyle. Whether you’re looking for a post-workout snack, a guilt-free dessert, or a protein-packed breakfast, this easy-to-make recipe is the perfect solution. By choosing the right ingredients—such as quality protein powder, natural sweeteners, and a creamy base—you can customize your pudding to match your dietary needs and flavor preferences.
Not only does protein pudding help with muscle recovery and weight management, but it’s also a satisfying way to curb sweet cravings without the added sugars found in traditional desserts. Plus, with endless variations like chocolate, vanilla, peanut butter, and vegan options, you’ll never get bored of this nutritious treat.
Now that you know how to make the perfect protein pudding, it’s time to get creative in the kitchen! Experiment with different flavors, toppings, and mix-ins to find your favorite combination. Enjoy your healthy, protein-rich pudding anytime—guilt-free!
More Article Recipes You Might Like
Looking for more delicious and nutritious breakfast ideas? If you love protein-packed treats like this protein pudding recipe, you might also enjoy these baked scrambled eggs with cheese for a warm, protein-rich morning meal. For a savory spin on brunch, try our Eggs Benedict Casserole Recipe, a hearty twist on a classic favorite. For a fun and unique twist on breakfast, try making mini pancakes—they’re light, fluffy, and easy to customize with your favorite toppings. And if you’re craving something sweet yet comforting, this simple chocolate gravy recipe pairs perfectly with biscuits or pancakes for a decadent but easy-to-make treat!
Frequently Asked Questions about Protein Pudding Recipe
How do you make a protein pudding?
Making protein pudding is simple! Start by mixing a scoop of protein powder with your choice of liquid (milk, almond milk, or a protein shake). Add a thickening agent like Greek yogurt, chia seeds, or cornstarch. Blend or whisk until smooth, then refrigerate for at least 30 minutes to thicken. You can enhance the flavor with vanilla extract, cocoa powder, or a natural sweetener.
Are protein puddings healthy?
Yes! Protein puddings are a nutritious option, especially when made with high-quality protein powder, natural sweeteners, and wholesome ingredients. They help with muscle recovery, keep you full longer, and can support weight management. However, always check ingredient labels if using store-bought options, as some may contain added sugars or artificial ingredients.
Can I use a protein shake instead of milk for pudding?
Absolutely! Using a protein shake instead of milk can add extra protein and flavor to your pudding. Just be sure to use a thickening agent like Greek yogurt, chia seeds, or a little cornstarch to achieve the right consistency.
Can you put protein powder in pudding mix?
Yes! You can mix protein powder into traditional pudding mix to boost the protein content. Simply add a scoop of protein powder to the dry mix, then prepare it as directed using milk or a dairy-free alternative. Adjust the liquid amount as needed to prevent a chalky texture.